Zero Downtime Laravel Deployment with Gitlab & Deployer
Kubernetes and other container based deployment systems are great for larger companies, but the cost and complexity can be limiting for smaller teams. Luckily, it's possible to implement robust continuous integration and zero downtime continuous deployments with your existing infrastructure and the help of gitlab & deployer.
Just want to see the code and configuration? The example repo for this post is here.
Setting up Gitlab CI
Gitlab providers completely free CI, even if you don't use Gitlab for git hosting. For the purposes of this post, I'm going to start from scratch with a fresh Laravel installation and guide you through the process of setting up the pipelines which we'll use for testing, building and deploying our code to production.
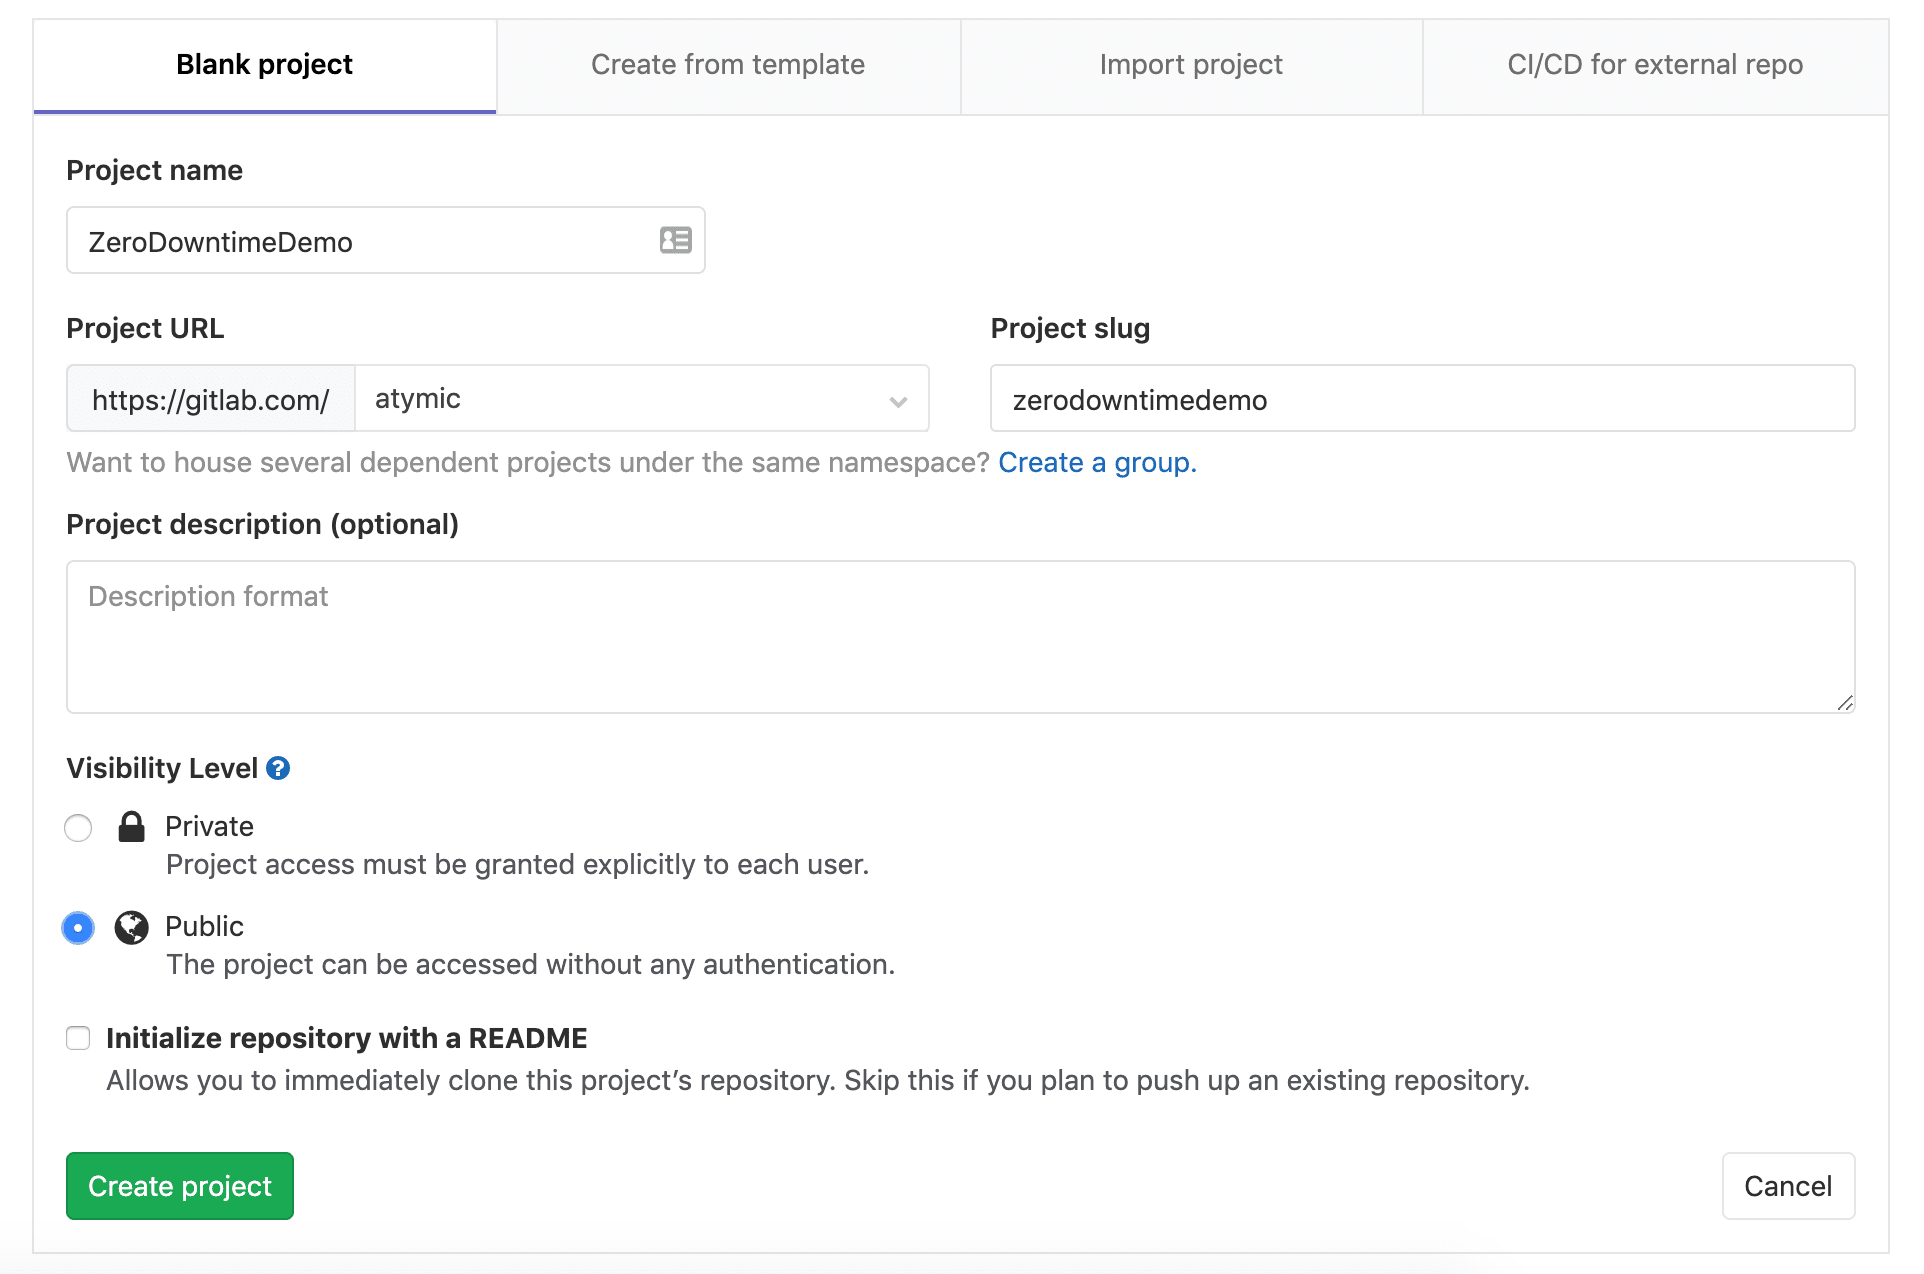
Head over to gitlab and create a new project. If you are starting a new project, or are happy to move your git hosting to Gitlab, you can use the "Blank Project" option, otherwise select the "CI/CD" option and link it to your Github repository.
Gitlab CI is configured using a .gitlab-ci.yml placed in the root of your project. Inside this file, you can define your build steps (and what they do), the order they run, caching and many other features. For our application, we'll just use a simple three step build.
Running PHP linting and tests
Most applications these days will have some sort of automated limiting and (hopefully) tests. Ensuring that the code is valid and works before deploying to production is a good idea, for obvious reasons. If the CI build finds a syntax error or failing test, it won't proceed to deployment.
In our .gitlab-ci.yml configuration file, we'll define a test:php stage. Laravel has some sample tests built in, which we'll run. You could also run limiting and static analysis tools in this stage.
test:php:
  image: atymic/php73-runner # A docker PHP runner image built for CI/CD
  stage: test
  script:
    # Other tests/static analysis/linting could be run here as well
    - composer install
    - ./vendor/bin/phpunit
Building Javascript and CSS assets
Laravel comes bundled with Mix, which provides an easy interface to webpack to build and compile your front end assets (Javascript and CSS). This step just installs our javascript dependencies & uses mix to build the assets.
It's worth noting here that we are using build artifacts. These are required because we'll be deploying the built assets along with our PHP source code, and each stage of the build operates on a fresh version of the source code.
build:js:
  image: node:12
  stage: build
  script:
    - yarn install
    - yarn prod
    - cat public/mix-manifest.json # See asset versions in the build log
  artifacts:
    expire_in: 1 week
    paths:
      - public
Deploying the code
Now that we've made sure that our code works & have built our assets, we can move on to the actual deployment.
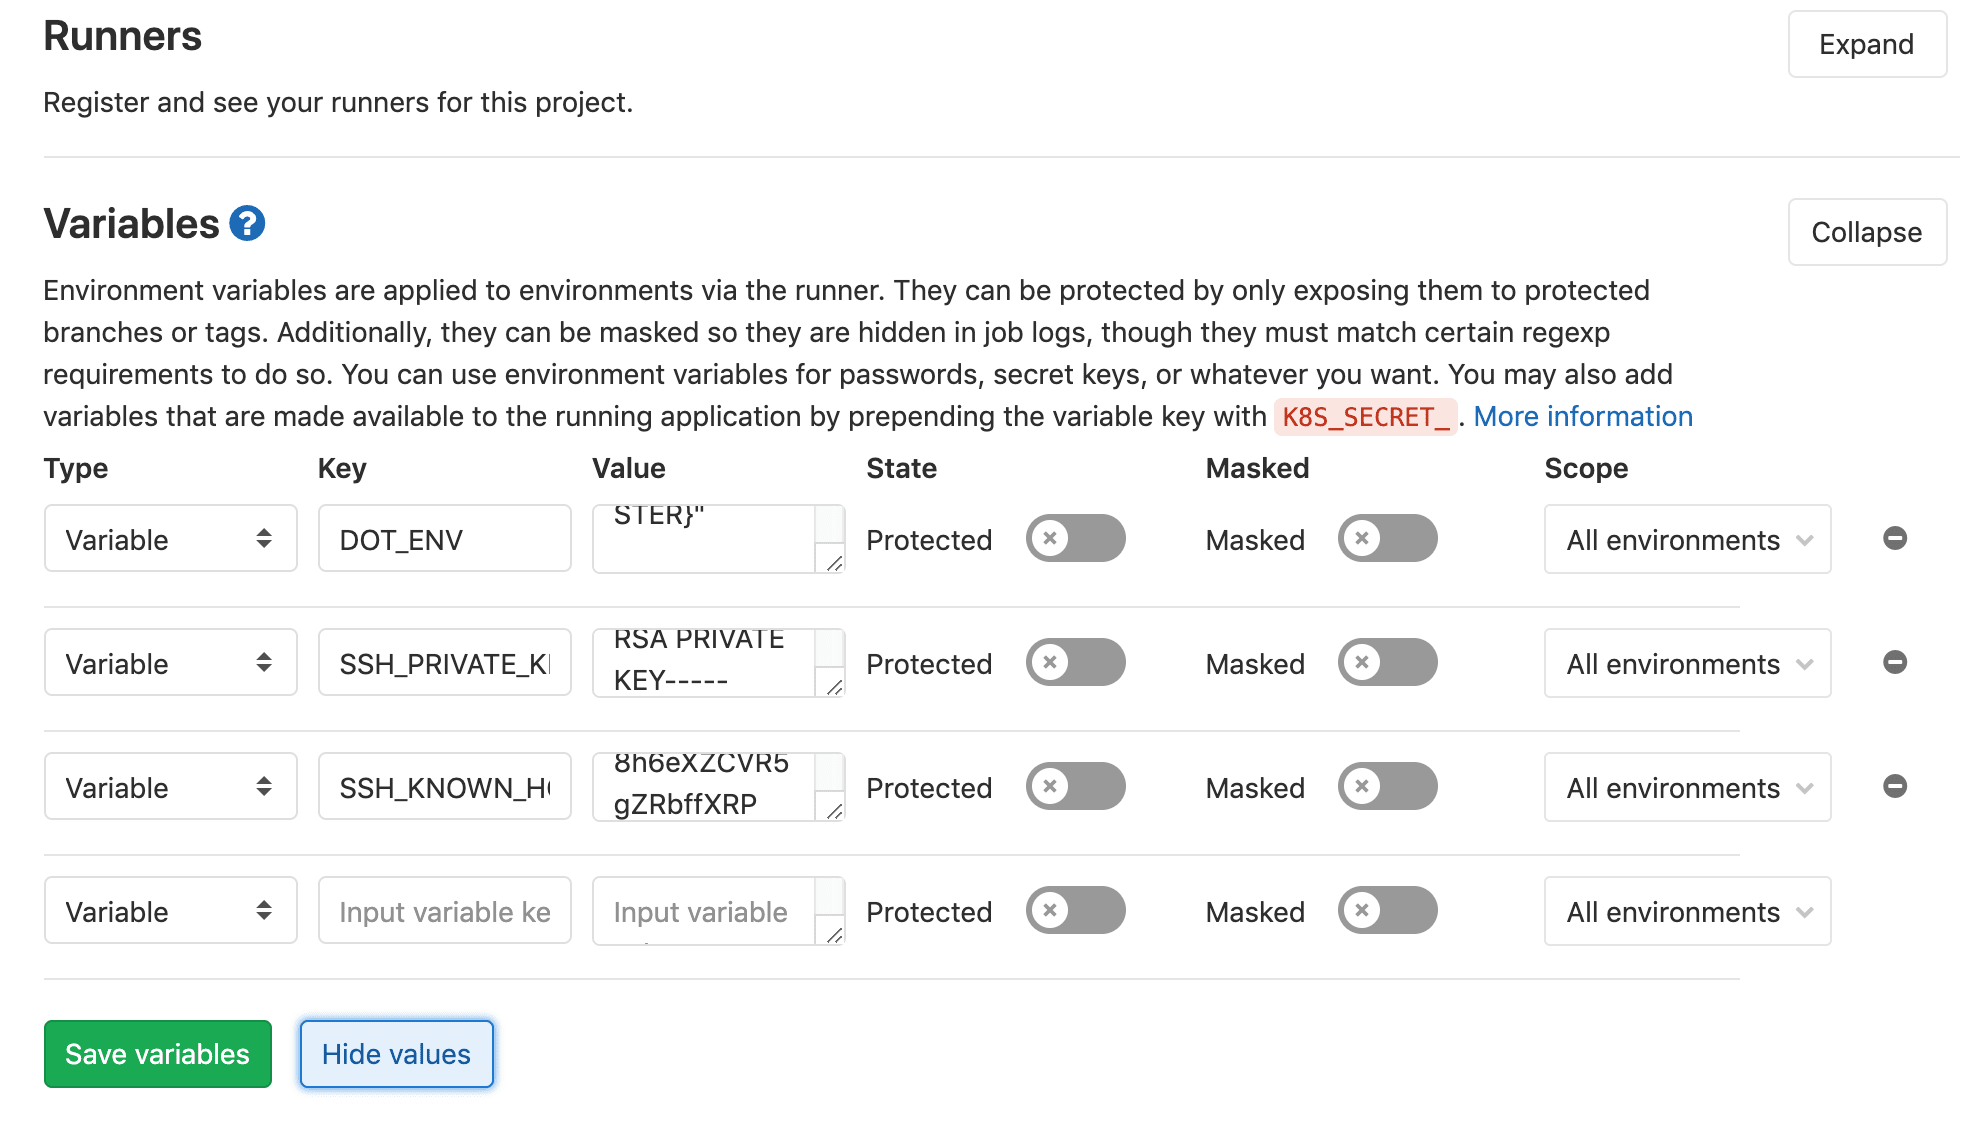
Head over to your project's settings on gitlab, and under CI/CD expand the "Variables" section.
We'll need to add a private key with access to the server so that deployer can SSH in. It's a good idea to generate a new key specifically for deployment, in case it needs to be rotated. You'll want to add it under the variable SSH_PRIVATE_KEY.
You'll also need to add your Laravel .env file as DOT_ENV, so it can be deployed along with the code (you should never store secrets in git).
Since every CI build/deployment starts from a fresh slate, the containers ~/.ssh/known_hosts file won't be populated. To ensure there aren't any MITM attacks, we need to our server's SSH fingerprint as a variable, SSH_KNOWN_HOSTS.
You can find you server's host fingerprint by running ssh-keyscan rsa -t <server IP>.
Notice that we have defined the build:js stage as a dependency, which will make Gitlab download and apply the built assets so that they can be deployed to production.
We've also added an only rule, ensuring that only commits to the master branch are deployed. If you don't add this, commits to any branch will be deployed (for example, testing and dev branches).
The stage finally runs dep deploy, which uses deployer to carry out the zero downtime deployment (we'll set it up later on).
deploy:
  stage: deploy
  image: atymic/php73-runner
  dependencies:
    - build:js
  before_script:
    - mkdir -p ~/.ssh
    - eval $(ssh-agent -s)
    - echo "$SSH_KNOWN_HOSTS" > ~/.ssh/known_hosts
    - chmod 644 ~/.ssh/known_hosts
    - echo "${SSH_PRIVATE_KEY}" | tr -d '\r' | ssh-add - > /dev/null
  script:
    - dep deploy production --tag=$CI_COMMIT_REF_NAME -vvv
  only:
    - master
Putting it all together
Now that we've got all of our steps configured we'll need to define the order that the stages run in (test, build then deploy) using the stages section (see the example below).
We've also configured a cache for our composer & javascript dependencies to speed up future build (saving us from having to download and install everything again).
stages:
  - test
  - build
  - deploy

cache:
  untracked: true
  paths:
    - node_modules/
    - vendor/

test:php:
  image: atymic/php73-runner
  stage: test
  script:
    # Other tests/static analysis/linting could be run here as well
    - composer install
    - ./vendor/bin/phpunit

build:js:
  image: node:12
  stage: build
  script:
    - yarn install
    - yarn prod
    - cat public/mix-manifest.json
  artifacts:
    expire_in: 1 week
    paths:
      - public

deploy:
  stage: deploy
  image: atymic/php73-runner
  dependencies:
    - build:js
  before_script:
    - mkdir -p ~/.ssh
    - eval $(ssh-agent -s)
    - echo "$SSH_KNOWN_HOSTS" > ~/.ssh/known_hosts
    - chmod 644 ~/.ssh/known_hosts
    - echo "${PRIVATE_KEY}" | tr -d '\r' | ssh-add - > /dev/null
  script:
    - dep deploy production --tag=$CI_COMMIT_REF_NAME -vvv
  only:
    - master
Setting up Deployer
Now that we've got the CI set up, it's time to install deployer in our project and configure it.
composer require deployer/deployer deployer/recipes Once you've got it installed, run ./vendor/bin/dep init and follow the prompts, selecting Laravel as your framework. A deploy.php config file will be generated and placed in the root of your project.
By default, deployer uses GIT for deployments (by SSHing into the server, running git pull and executing your build steps) however since we are running it as part of a CI/CD pipeline (our project has been built and is ready for deployment) we'll use rsync to copy the files directly to the server instead.
Open your deploy.php in a code editor. Copy and paste the code below into your deploy.php above the hosts section.
<?php

namespace Deployer;

// Include the Laravel & rsync recipes
require 'recipe/laravel.php';
require 'recipe/rsync.php';

set('application', getenv('CI_PROJECT_NAME')); // Configure from gitlab's env vars
set('ssh_multiplexing', true); // Speed up deployment

set('rsync_src', function () {
    return __DIR__; // If your project isn't in the root, you'll need to change this.
});

// Configuring the rsync exclusions.
// You'll want to exclude anything that you don't want on the production server.
add('rsync', [
    'exclude' => [
        '.git',
        '/.env',
        '/storage/',
        '/vendor/',
        '/node_modules/',
        '.gitlab-ci.yml',
        'deploy.php',
    ],
]);

// Set up a deployer task to copy secrets to the server.
// Since our secrets are stored in Gitlab, we can access them as env vars.
task('deploy:secrets', function () {
    file_put_contents(__DIR__ . '/.env', getenv('DOT_ENV'));
    upload('.env', get('deploy_path') . '/shared');
});
Next, we need to set up our hosts. In this example, we'll only use a single host but deployer supports as many as required. Copy the code below into your deploy.php, replacing the existing hosts block. You'll need to customise it your server configuration.
// Hosts
host('production.app.com') // Name of the server
    ->hostname('165.22.242.104') // Hostname or IP address
    ->stage('production') // Deployment stage (production, staging, etc)
    ->user('deploy') // SSH user
    ->set('deploy_path', '/var/www'); // Deploy path
Next, we'll set up the steps that deployer will execute as part of our deployment. These can be customised to your needs, for example you could use the artisan:horizon:terminate task to restart your horizon queues. Copy the block below into your deploy.php, replacing the tasks section.
after('deploy:failed', 'deploy:unlock'); // Unlock after failed deploy

desc('Deploy the application');
task('deploy', [
    'deploy:info',
    'deploy:prepare',
    'deploy:lock',
    'deploy:release',
    'rsync', // Deploy code & built assets
    'deploy:secrets', // Deploy secrets
    'deploy:shared',
    'deploy:vendors',
    'deploy:writable',
    'artisan:storage:link', // |
    'artisan:view:cache',   // |
    'artisan:config:cache', // | Laravel specific steps
    'artisan:optimize',     // |
    'artisan:migrate',      // |
    'deploy:symlink',
    'deploy:unlock',
    'cleanup',
]);
Configuring your Server
We'll also need to make a few changes the nginx or apache configuration files on the server.
You want to set your web server root to deploy_path (set in your deploy.php) + /current/public. For example, in our case this is /var/www/current/public.
You'll also need to make sure that your deploy user has the correct permissions to write to the deployment path. Deployer's deploy:writable task will ensure that the folders have the correct permissions so your web server user can write them.
First deployment 😎
Now that everything's set up, it's time to test our pipelines!
Commit your .gitlab-ci.yml, deploy.php and your composer json/lock and push! If all goes well, you can head over to the "Pipelines" section in gitlab and watch your build/deployment progress.
If anything goes wrong, check the CI logs. It's usually fairly obvious as to what went wrong (missing SSH keys/fingerprints, invalid server config, etc).
If everything went well, you'll have the latest version of your project deployed. Any new commits will be built and deployed without any interruption for you users.
Here's the first deployment of my test repo, and one with a migration.
Wrapping up
This post outlines a basic CI/CD pipeline, but there's plenty of improvements and additions that could be made, such as adding staging environments, release notifications, multi server deployment (for load balanced server groups).
I hope you enjoyed this post and it helped you improve your builds & deployments.
If you have any questions, leave a comment below & i'll do my best to respond to them all.